Hi - I decided to join this group after reading about it on another blog - looks great!
Getting to know me facts: I am Su, and I live in Gloucestershire in England with my husband and 2 children (9 and 7). I work part-time 2 days a week, as well as working from home with Stampin' Up! We got our first pet over Christmas - an African Land Snail! I am really into stamping, and just love stamps - as the saying goes 'I'm addicted to Stamps', as well as using my Big Shot, Sizzix and Cuttlebug stuff for making cards. I help run a monthly craft club (all cardmaking now) which is great fun, do the occasional demo at another club and am starting a Stamping Club in the New Year.
If you want to join in the fun, the link is http://sisterhoodofthebloggingstampers.blogspot.com - there are 20 in each group, and there is still space in group 8 at the moment.
Sunday, 30 December 2007
Saturday, 29 December 2007
Belated Christmas Card!
 Yes - I am belatedly posting my final Christmas Card design - one that I was happy with for mass-producing - and it wasn't the one I previously posted! The last couple of weeks have been completely manic - but as always we had a wonderful Christmas, and I hope you did too.
I hope most people got theirs before Christmas - but no doubt some were late. (New year's resolution - to start my Christmas cards in August! LOL!)
I got the idea from Jacki (The Card Castle) who used the Baby Words Cuttlebug Embossing folder with a crib image - thanks Jacki, everybody has loved it! The scanned image doesn't do it justice really, but I am sure you get the idea - the crib stamp was from the nativity clear set from Lakeland.
I made around 60 cards in 3 sittings. A much reduced number due to sending an e-greeting to most people we know.
And yes the e-greeting contained an image of a crib, but also a link to our family Elf Show. If you've not yet seen one of these (I've been Elfed!) it's well worth a look - so hilarious, and you can custom-make your own: http://www.elfyourself.com/?id=1452243874 (To get the right bodies, you need to upload your face photos in the following order: DW, DD, DS, DH.)
Saturday, 15 December 2007
Daisy Card
I decided to change the Daisy Thank You card I made the other day - for a card challenge. I really didn't like the ribbon bow on it - so I took it off and what a difference. 

Just goes to show that too much really can be too much! LOL! My only excuse is that I was trying to follow the challenge instructions and it said buttons and bows!
What do you think - is it better without the bow?
Wednesday, 12 December 2007
Pay It Forward
I agreed to do the 'Pay it forward' exchange on Jacki's blog today.
PAY IT FORWARD: handcrafted items - a bit like swapping ATC's with a twist! I will send a handmade item to the first 3 people who leave a comment on my blog requesting to join this "Pay it Forward" exchange. I don’t know what that gift will be yet and you probably won't receive anything before the year is over but I promise to get something in the mail by January. In order to participate, though, you must 'pay it forward' by making the same promise on your blog. Jacki's blog can be found at http://thecardcastle.blogspot.com/ and just like her cards, I thought this idea was great.
So basically, if you're one of the first 3 people to leave a comment on this post, joining this exchange, I’ll send you something crafty that I’ve made! Once you sign up, copy and paste the above paragraph on your blog - you'll get something from me via snail mail and then three other fortunate people will be recipients of your handmade work. So spread a little handmade cheer!! This will be great fun... I can't wait to see what Jacki is going to send to me - and I've now got to get my thinking cap on to make up something lovely for my exchange!
Tuesday, 11 December 2007
Card Challenge
Here is my card for the UKScrappers December Card Challenge - http://www.ukscrappers.co.uk/boards/showthread.php?t=198179 
I hope to have time to do more of these challenges - but first I need to concentrate on those Christmas cards!

UKS based the challenge on some great sketches from the Pagemaps site - http://www.pagemaps.com/ - there are absolutely loads of fantastic card, tag and scrapbook layouts to view, print and download, as well as a great archive with even more to choose from!
I made the card using some Polar Bear papers & vellums, buttons from Papermania and Sizzix daisies. Hope you like it!I hope to have time to do more of these challenges - but first I need to concentrate on those Christmas cards!
Free Stuff!
I do like to get my hands on free stuff on the web!
This time last year, I discovered an Advent Countdown of downloadable images - by Lisa Vollrath - it is classed as linkware, and once linked, they are then free for you to use for your own personal use. All of the images are absolutely gorgeous and there are lots of vintage and modern images - I think my favourite so far is the Angel stamps (day 4). So here is the link: http://www.tentwostudios.com/countdown/.
More free stuff is also available at the sister websites if you check out their links.
I think this year's images surpass last year's and I am really spoilt for choice - perhaps I could use one or two of them on my Christmas card - yes I know the past date for posting is looming, and I still haven't decided what card to make!!
Friday, 7 December 2007
Christmas Cards
Well, I am still working on it - the master plan Christmas card that is! The question is - portrait or landscape?! LOL
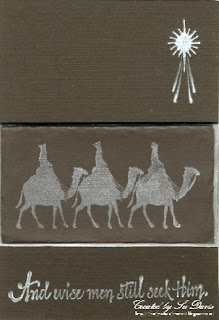
I used a clear Nativity stamp set from Lakeland for these cards, with Brilliance Moonlight White ink. Greeting stamp by Serendipity.


I used a clear Nativity stamp set from Lakeland for these cards, with Brilliance Moonlight White ink. Greeting stamp by Serendipity.

Thursday, 6 December 2007
Book Reviews
I haven't had chance to do any proper book reviews yet. But I have managed to create a slide show of my favourite card making books, at the bottom of the page. Pointing your mouse over a book will tell you the current price of the book at Amazon. Most of the prices are pretty good. But do beware - if an item is out of stock at Amazon store itself, it can still get listed with an inflated price - as they sometimes list partner store prices, which can be pricey, plus extra p&p is charged. (If you want to buy a particular book, just click on the book and it should take you direct to the relevant Amazon ordering page, otherwise, try the general link on the right.)
Friday, 30 November 2007
Videos
Hey, I haven't had chance to upload any cards today - so I thought I would share a great video clip instead (you may have already seen it, but if so, it's probably worth a second look):
It has a card theme and is soooo funny: http://www.livevideo.com/video/537FF9DA20B44560845DEE157D1F9DD6/man-made-card.aspx?m_tkc=7540036
TTFN
It has a card theme and is soooo funny: http://www.livevideo.com/video/537FF9DA20B44560845DEE157D1F9DD6/man-made-card.aspx?m_tkc=7540036
TTFN
Wednesday, 28 November 2007
Sizzix Snowman
I made this cute little fella for the youth group's craft activity this week! I had to go and buy the Sizzix snowman die from EBay, as he was not surprisingly sold out in most places, and I am very pleased with it. I like the effect of the white hammered card for the snowman himself and also the snowdrift behind. I found he looked a little odd without a nose, so added the orange triangle for a carrot nose. It's great for kids card making sessions and I am sure we will all get a lot of use out of it (once a year!)

Have to say the kids were a lively bunch - well several bunches really as we had them come in 3 separate groups to make the cards as there wasn't room for them all at once. What a racket - certainly not the usual calm and relaxing crafting session!
However, I think most of them enjoyed it and it's nice to see them sat together making something for their family or friends.
Last night I got my daughter making some of these for her brownie leaders as it's their last night tonight before Christmas - scary how quickly Christmas arrives!
I must start my own Christmas cards soon - still do not have a design in mind! It needs to be quick and easy with a 100 or so to make - so I won't be making this one again in a hurry!
I normally end up sending my cards out after the last day of posting. Not good I know!
Su
Tuesday, 27 November 2007
Pyrography
I was browsing thru a crafting forum earlier and came across a post enquiring about Pyrography - I expect it is going to get more popular as stores are now selling 'toys' of this.
 I've done Pyrography (wood burning) several times at a Scripture Union family camp - it is absolutely addictive and even though the equipment was mainly there for the kids, parents were also absorbed and taking ages to create their own works of art. Here is what my daughter did last May, using a Disney stencil - it's a door plaque and is pretty good for an 8 year old!
You do need a bit of practice to get used to whatever tip you are using (as they will all be different) as well as the heat setting, as this will also impact on your 'writing/ drawing' result. So practice on scraps of wood first. I found outlining a simple line drawing, or tracing around a stencil with a pencil works best - unless you are really good at art!
Images can be left or they can be coloured in with whatever you want - felt tips, crayons, watercolour. The equipment we were using was the genuine, old fashioned stuff - very, very hot (the metal tips could glow red hot from the heat), so adult supervision was necessary and there was temperature cuts outs, a safety switch off button as well as a pot of water big enough to put hand in (this has to be kept away from the electrics though!) Having said this - kids of 4-6 were managing very well.I have seen - and will be interested to see any reviews - of the new pyrography 'toys' currently being sold.
If the new 'toys' (I wouldn't class them as toys, unless they have some new technical stuff that burns into wood without the tip getting hot) are as good, I might go out and buy one tomorrow! (The 'proper' ones are available at places like Hobbycraft and on EBay, but I guess like anything, it's worth getting a recommendation before buying.)
If you know more - and/or can recommend a product and where to buy - please let me know! Thanks.
My first Stampin' Up! Cards
I finally got the photos to upload! Here are the 2 cards that I made last week.


They are pretty simple and copied directly from the SU booklet as I needed something really quick and easy, having only half an hour or so to make a couple of cards up, after getting all the stamps mounted and my paper and ink organised!

For the birthday card, I just love the combination of tempting turquoise and green galore. I used flowers from the Mixed Bouquet Set - creating a watermark effect with versamark ink on the blue card. Wrapped white SU ribbon around that and then mounted onto the green. Stamped a flower from Mixed Bouquet set in green galore and on top stamped a birthday greeting (from Cheers and Wishes set) in black - mounted this onto the watermarked turquoise.
Thank You card is made with SU real red and green galore card stock. Used the Jumbo Spot On Stampin Around Wheel with versamark ink to create a watermarked border (sorry, it didn't show up well in the photo) down the right hand half of the card (what fun I am going to have with these Stampin Around wheels, they are great!) Then stamped the flower and thank you circle from the Seeing Spots set, in real red and green galore inks, onto a small white square. Mounted that onto green galore card and then stuck onto centre of card.

I love the way these SU stamp sets, along with the card and ink, co-ordinate so that all the hard work is taken out of designing a card, if a quick one is needed. I really need to build up a stock of cards, as it is always a last minute rush making a card for someone - I'll do this whilst having fun, playing around with these new sets.
Sunday, 25 November 2007
France!
Wow - what a brilliant weekend we had in France! We had a long weekend there, Christmas shopping in Calais (how that place has changed in 20 years!) Lots of excellent food, supermarket, clothes and speciality shopping!
The best restaurant there is Le Channel, and well worth a visit but you do need to book - http://www.restaurant-lechannel.com/modulosite2/fiche.php?id=537&fr=0 - their shop is a real treat also with wines of varying prices and specialities, along with a great deal of expert advice from Arnaud and tempting gift ideas (the cheeses always look great too, but we never have space in our car for a cool box!)
At Cite Europe, I got a little something for my Stampin' Up! workshops and classes - a very large free standing wire Cat which will display cards, along with a smaller free standing display, with a matching cat theme - I think they are meant for displaying photos. I will try and take some photos of those tomorrow (along with my first SU cards - which blogger refuses to load at the moment....)
BFN!
Thursday, 22 November 2007
My Stampin' Up! Kit has Arrived!
Yesterday was the day! The Demo Starter Kit arrived and was perfect timing as I have a stand at the local Playgroup's Craft and Pamper evening on Friday! Am organising what to put on my display boards (which I got today) and then I put together a few sample cards, albeit rather hastily - and printed off my flyers!
The stamp sets are lovely - have a look:

Images © 1990–2007 Stampin’ Up!
And as for the Jumbo wheel - wow! I have had stamping wheels before but they have always been a bit cheep and nasty looking and not given good results either. Having seen the results of their use of various SU blogs, I know I am going to get on with this one!
Images © 1990–2007 Stampin’ Up!
And if you want to know why I did not drop anything to just get and stamp as soon as they arrived - I couldn't! DH had taken the day off work and we were decluttering the house to get it straight for my mother-in-law who is coming for the weekend. Yes, we worked none-stop!
Hopefully later I shall Post my sample cards for you to look at. Till later then....
Tuesday, 20 November 2007
Card Layout
Yesterday I was looking to make a lilac card with layers and finally came up with the following card, which once thought out, took no time at all. Do you find that 3/4 of your time is taken up with thinking about what design of card to use and then finding all the right materials, stamps, etc? I certainly do! I keep telling myself when I hit on a good one, I should make up a batch of at least 5, to make good use of all that thinking and prep.time.


Lilac piece of card with torn edge - stamped with Rubber Stampede Daisy blossom flower and Artifacts small flowers stamps - in Brilliance Pearlescent Lavender, then matted onto Navy card piece with torn edge - all edges inked. Lavender organza ribbon wrapped around the finished matt, then piece stuck to Lavender base card. Just Thinking of You (Rubber Stampede again) stamped onto piece of lilac, matted onto Navy and then this finally matted onto card to. Finished off with some irridescent glitter in the flower centres.
Realistically, I probably won't be able to do any more of these this week! But check me out this time next week - and let me know if the layout helps you too!


Anyway, here is the card and I like it so much, I will make more - when I have time - and I also plan to use the same design using different stamps and colour cardstock to see how many different looks I can come up with! I've done a plan of the card layout, so I - and you can reproduce it - what do you think?
Lilac piece of card with torn edge - stamped with Rubber Stampede Daisy blossom flower and Artifacts small flowers stamps - in Brilliance Pearlescent Lavender, then matted onto Navy card piece with torn edge - all edges inked. Lavender organza ribbon wrapped around the finished matt, then piece stuck to Lavender base card. Just Thinking of You (Rubber Stampede again) stamped onto piece of lilac, matted onto Navy and then this finally matted onto card to. Finished off with some irridescent glitter in the flower centres.
Realistically, I probably won't be able to do any more of these this week! But check me out this time next week - and let me know if the layout helps you too!
Monday, 19 November 2007
Cuttlebug & Sizzix
I do think that the Cuttlebug embossing folders make a perfect partner for my Sizzix diecuts - perfect for quick and easy cards - as this card shows:

I used to have a pink die cutting (similar to red sizzix) machine but could not get on with it. Then the Ellison Big Shot came along and what a breeze it is! I especially like the fact that it fits an A5 sheet of card on the cutting plate.
And then came along cuttlebug with its embossing folders - now me and my friends do think these are the next best thing to sliced bread (is that a good thing?) No brass, just a plastic folder in which you put your piece of card or die cut shape. Their range is fab and ever expanding - good job they are very reasonably priced!
Used: Ellison Thick Cuts Flower Daisy#2 (Sizzix Bigz Die - Flower, Daisy #3), checked pink ribbon, sticky crystals , Cuttlebug Happy Birthday embossing folder.
Splitcoast Stampers is the perfect place to go browsing for more cards like this - or to showcase your own. Another favourite site of mine is Heart Prints Cuttlebug Gallery at http://www.heartprints.net/gallery/cuttlebug/page/1/.
Decorative Stamping
I've never really paid much attention to decorative stamping, or really any decorative papercrafting - it's all been about cardmaking for me. A die-hard cardmaker! So, I've always flicked straight past the likes of decorative stamping in magazines and books with a shudder....
But on holiday in France this year, my friend took an interest in those small balsa wood boxes in the craft section of a supermarket (how I just love those French Supermarkets - Auchan, LeClerk, HyperU - the food, the chocolates, the stuff......) as it was just the right size for one of her treasures. So I said something along the lines of I could decorate it if she wanted, even do it and give it to her as a birthday present - think I may have even said something along the lines of, 'these boxes are always being decorated - it will be pretty easy with all the stamps and stuff I have.....'
Well, that landed me right in it - especially when the day of her birthday arrived as the box remained undecorated as I didn't have a clue how to go about it! So to work, without any planning or research (all those wasted crafting and stamping magazine articles....) I stippled all over the outside of the box with Pearlescent Coral Brilliance ink (using a stencil/stipple brush) until the wood had a nice pink-coral sheen to it. The using a Versafine Vintage Sepia inkpad (black would have given too harsh an image) I stamped various images and words over the box - my acrylic stamps (by inkadinkado) came in very handy as I could see where I was placing them on the small box. I then heat set the whole thing (I had coral hands by then!) over a toaster (couldn't find my heat gun LOL!) And would you believe - it really looked pretty good - especially as it was my first attempt, only having the one box. I wrapped a gift voucher in tissue paper and placed in the box. Hey presto - a brilliant and pretty gift - take a look yourselves:


Box Top/Front of Box


Inside Box/Side View


Back of Box/Underneath-Bottom of Box
Well - I think it looked nicer in the flesh than these photos! But it has opened up the possibilities of decorative stamping for me and no doubt when I am next in France (which is pretty soon - Calais for Christmas shopping) I'll see if I can cut back on the hoards of Rochers (french chocolate 'bombs' - completely different to the gold wrapped chocolates we get in the UK) I shall be throwing into my trolley and make a bit of room for a balsa wood box or two.
I have seen those Rochers on eBay - someone actually ships them over to the US. It's a strange thing that they are not even sold here in the UK. I always get lots of strange looks from both French and British people as they notice me put three-hundred-weight of the things into my trolley whenever we go (well I do have to stock up!) I'll post a couple of photos of them sometime, so you know what I mean. Pity Google haven't come up with a click and sniff invention for the Internet yet!
Sunday, 18 November 2007
Competitions
Crafting competitions abound on the Internet - some of them worth doing, others not. So when I see a good one, I'll let you know! TrimCraft have one just now, to publicise their upcoming new website. The first prize is a £250 store voucher. They just want your email address - http://www.trimcraft.co.uk/competition.php. Their website has some pretty good project pages on it too - I like looking at card galleries and project pages to see different layouts and then use my existing crafting stock and stamps to create a similar format card. I suppose I should get organised and try some of the card challenges out there!
Here is  another card I have made with Perfect Pearls powder. I used a Rubber Stampede Gerbera stamp with versamark ink and then brushed on the powders. I layered the stamped card bit onto torn mulberry paper and stuck it onto the folded card. Added ribbon and a smaller sunflower embellishment - I made the embellishment with a Krafty Lady Art Mould from the Stamp Bug (http://www.thestampbug.co.uk/) and paperclay. Coloured the dry sunflower (its actually called Daisy 1) with pearlescent inks and stuck it onto the card. Finished off with a die cut MUM using some alphabet punches. Jane from the Stamp Bug does some great art mould workshops - well worth a visit.
 another card I have made with Perfect Pearls powder. I used a Rubber Stampede Gerbera stamp with versamark ink and then brushed on the powders. I layered the stamped card bit onto torn mulberry paper and stuck it onto the folded card. Added ribbon and a smaller sunflower embellishment - I made the embellishment with a Krafty Lady Art Mould from the Stamp Bug (http://www.thestampbug.co.uk/) and paperclay. Coloured the dry sunflower (its actually called Daisy 1) with pearlescent inks and stuck it onto the card. Finished off with a die cut MUM using some alphabet punches. Jane from the Stamp Bug does some great art mould workshops - well worth a visit.
Stampin' Up! UK Has Landed!
Yes that's right - Stampin' Up! UK has finally launched! I've been accepted as a demonstrator, which is great as I have waiting and waiting to get my hands on those gorgeous stamp sets. My Starter Kit along with the UK's first ever Stampin' Up! Ideas Book/Catalogues should arrive this week and then I can get stampin' and creating! Can't wait to put in my first proper order and also maybe get hold of Mr Crabby Pants. And if you you haven't heard of Stampin' Up! you are in for a treat! Take a look at Dawn's website on the right - she and her fellow SU bloggers make such fabulous cards, they are a real inspiration!
 Until I get some SU stamps I am having to make do with my usual stash - here's a card stamped using a Versamark Inkpad and some clear acrylic leaf stamps and a happy birthday stamp. I've then brushed over the images with Perfect Pearls for a lovely autumnal look. I use cheap hairspray to 'fix' the powder, same as when using chalks. Have to say that I don't get my Perfect Pearls powders out much - but they are really great and so easy to use when I do. And if you want a taster - try out this link: http://www.stampinup.com/Web2001/ViewProducts.asp?showideacenter=false&image=saround_large.jpg
 Until I get some SU stamps I am having to make do with my usual stash - here's a card stamped using a Versamark Inkpad and some clear acrylic leaf stamps and a happy birthday stamp. I've then brushed over the images with Perfect Pearls for a lovely autumnal look. I use cheap hairspray to 'fix' the powder, same as when using chalks. Have to say that I don't get my Perfect Pearls powders out much - but they are really great and so easy to use when I do. And if you want a taster - try out this link: http://www.stampinup.com/Web2001/ViewProducts.asp?showideacenter=false&image=saround_large.jpg
Welcome!
Welcome to my new blog! I've had to move over all my stuff to a new blog, so there will be a few posts on each day as I get it all sorted. I hope you will enjoy reading my blog and enjoy the cards I post here, hopefully along with tutorials & projects, templates, best buys and my favourite place links.
 I recently made a few cards using the lovely Footprints (in the Sand) stamp, by Inkadinkado. Used a Brilliance Pearlescent Ice Blue inkpad - on dark blue grained cardstock (this colour always looks so fab inked on dark cardstock.) Then used a ruler to tear around the sides and stuck it down onto mottled white cardstock which I had first run through my Big Shot using the D'Vine Swirls cuttlebug embossing folder (if you haven't tried the cuttlebug embossing folders yet - do, they a wonderful - I will blog about them later - for card inspiration try http://sentimentsbydenise.typepad.com/!) Some silver organza ribbon highlighted each corner - then stuck whole thing onto dark blue A6 folded card using double-sided 3D foam tape. For writing on the inside, I used a silver gel pen, which worked really well.
Here is another variation on this card - without the ribbon and instead roughly tearing around the stamped image.
Tell me - which version do you prefer?
My last card here was made for my husband's Gran - she's 92, so I wanted something a little traditional (a flower!) but was also vibrant, 3D and that she would enjoy looking at. Used the huge Ellison Thick Cuts Flower Daisy#2 (which is the same as the new Sizzix Bigz Die - Flower, Daisy #3) with some fabulous bright pink grained paper (unbranded) to cut out 4 flowers - stuck down with double-sided tape and curled the ends of the petals. Several leaves cut with a Sizzix Medium Leaves die and letters from the Sizzix Sizzlits Girls Are Weird alphabet set - both in pale green cardstock. Finished off with a few pink flower brads in the middle and some thin pink organza ribbon. All mounted on a white square card, trimmed to a deckle edge using the Edgemaster/Carl Rotary Trimmer. Pink and pretty!

Subscribe to:
Posts (Atom)


